What is it?
When you fly behind a turning opponent you have three options for where your nose points: ahead of him (lead), straight at him (pure) or behind him (lag). The path that results is the pursuit curve.
When do I use it?
Offensive, as soon as you are behind him. Lead to shoot, pure to close, lag to keep distance and avoid overshooting.
What do I want to achieve?
You want to pick the curve that matches your problem. Always flying lead means overshooting; always flying lag means never getting a shot.
Starting position
You are behind him, he is turning, you have him locked and within weapons range or just outside.
Step by step
- Lead – shooting. Nose ahead of him, where he will be. This is the firing position. It cuts the corner and brings you closer – too close if you hold it too long.
- Pure – closing. Nose straight at him. The shortest way to him, but without lead no hits with ballistic guns.
- Lag – keeping distance. Nose behind him. You fly around the outside of his turn, lose no distance and do not overshoot.
- Switch. From lag to lead as soon as you can fly his turn; from lead to lag as soon as you get too close.
- Watch. Is the distance shrinking although you changed nothing? Then he has taken off speed – careful, overshoot.
Keyboard and mouse
The difference between the three curves is a few degrees of mouse. With free gimbals you can hold the nose slightly offset and still aim – that makes switching between lag and lead smoother.
Choosing the curve is a question of the nose – so of the rotation axes. Plus throttle to build or close distance, and gimbals for the last few degrees.
| Game action | Default keyboard/mouse | Default joystick | Trigger |
|---|---|---|---|
| Pitch | not bound by default | Axis Y | axis |
| Pitch up | Arrow down | not bound by default | single press |
| Pitch down | Arrow up | not bound by default | single press |
| Yaw | not bound by default | Axis X | axis |
| Yaw left | Arrow left | not bound by default | single press |
| Yaw right | Arrow right | not bound by default | single press |
| Roll | not bound by default | Axis Rz (twist) | axis |
| Roll left | Q | not bound by default | single press |
| Roll right | E | not bound by default | single press |
| Throttle - Increase | W | not bound by default | single press |
| Throttle - Decrease | S | not bound by default | single press |
| Lock Target Under Reticle | not bound by default | not bound by default | single press |
| Cycle Lock - Hostiles - Forward | 5 | not bound by default | single press |
| Lock Selected Target | not bound by default | not bound by default | single press |
| Gimbal State - Toggle Locked / Unlocked | G | not bound by default | toggle |
| Weapon Preset - Fire | Mouse left | Button 1 | hold |
Game default binding, game version 4.10.0-hotfix (55227). If you rebound it yourself, your binding applies.
Anything marked “not bound by default” you have to bind yourself in the game settings – we do not guess a key.
HOTAS/HOSAS: the joystick column is the default binding of ONE stick. On two sticks you assign pitch, yaw, roll and lateral strafe yourself – which axis a manoeuvre needs is listed in the HOTAS / HOSAS section.
HOTAS / HOSAS
A manoeuvre does not need particular keys, it needs particular axes and functions. If you fly HOTAS or HOSAS you assign them once and then only read which of them a manoeuvre asks for:
- Pitch, yaw, roll – the three rotation axes. By default on one stick they sit on X, Y and the twist axis Rz.
- Strafe X/Y/Z – sideways, up/down, forward/back. By default these are single buttons and a hat, not axes; on HOSAS you put them on the second stick’s axes.
- Throttle – the throttle lever or the forward/back function.
- Boost, space brake, decoupled mode – three buttons you must hit blind in a fight.
- Targeting – at least “lock target under reticle” on a thumb button.
Which of these are bound by default is in the table above. Everything marked “not bound by default” you assign yourself.
You need pitch, yaw and roll – and a feel for how far your nose may deviate from your course before you lose speed. A gimbal button belongs near the thumb.
Speed and energy
Lead costs the most energy: you cut the corner and have to pull harder. Lag costs the least and keeps your speed. If you notice you keep losing speed in lead, switch to lag for a few seconds.
Movement diagram
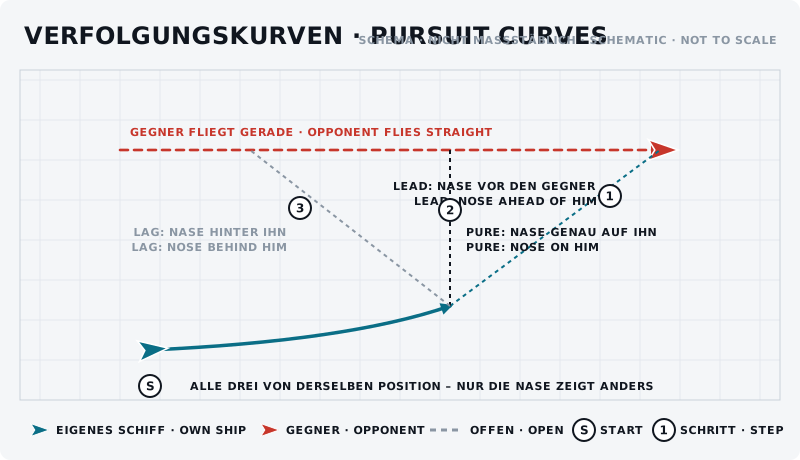
The sketch shows the manoeuvre from above: own ship blue, opponent red, start marked “S”, steps numbered.
What should the opponent see?
He can see from your nose what you intend. A nose far ahead of him announces the shot – that is why good pilots only pull into lead at the last moment.
Typical mistakes
- Always lead. Leads straight into an overshoot.
- Always pure. Feels right but misses with ballistic guns.
- Always lag. Safe, but you never win.
- Ignoring the distance. The curve is chosen by distance, not by habit.
Opponent’s counter
He takes off speed and forces you to overshoot, or he reverses the direction of his turn so your lead points into nothing.
Exercise
- Goal
- Be able to fly all three curves deliberately and notice what each does to the distance.
- Preparation
- A partner flies an even, wide curve and does not change it.
- Task
- Fly 30 seconds each of lead, pure and lag behind him. Note after each: did the distance grow or shrink? Would you have hit?
- Success criterion
- On call you can switch between the three curves without losing the lock.
- Partner
- required
- Functions needed
- Pitch
- Pitch up
- Pitch down
- Yaw
- Yaw left
- Yaw right
Beginner variant
Fly behind a partner who is flying a wide even curve and deliberately hold each of the three nose positions in turn.
Advanced variant
Switch between lag and lead every second without the distance changing. That is the basis of every clean pursuit.
Next step
If you want to hold the nose offset without changing your path you need strafing. If you get too close you need overshoot.