What is it?
In a rate fight both fly their own circle in the same direction after the pass. The winner is whoever closes his circle faster and thus gets the nose back on the other first.
When do I use it?
After every merge where both turn the same way. It is the standard answer when your ship comes around faster than his.
What do I want to achieve?
You want to gain angle without stopping: a little further behind him every lap until your nose is on him and his is not yet on you.
Starting position
Directly after the merge. Both turn the same way, both still have speed.
Step by step
- Set your turn speed. Not full throttle, but the speed at which your ship comes around fastest (see exercise).
- Into the turn. Immediately after the pass, in the same direction as him.
- Pull cleanly. Evenly, without jerking – every correction costs angle.
- Compare. After half a lap, is he further ahead or further behind than before? That decides whether you stay in it.
- Stay or switch. Gaining angle: keep going. Losing angle: switch to the radius fight or break out.
Keyboard and mouse
With a mouse you fly the sustained turn by holding the mouse in one direction and using the roll keys to put the ship so that the turn lies in its strongest axis – on most ships that is pitch.
Here the turn itself counts and how you feed it: rotation axes, throttle, boost – and the acceleration limiter, which decides how hard your ship enters the turn.
| Game action | Default keyboard/mouse | Default joystick | Trigger |
|---|---|---|---|
| Pitch | not bound by default | Axis Y | axis |
| Pitch up | Arrow down | not bound by default | single press |
| Pitch down | Arrow up | not bound by default | single press |
| Yaw | not bound by default | Axis X | axis |
| Yaw left | Arrow left | not bound by default | single press |
| Yaw right | Arrow right | not bound by default | single press |
| Roll | not bound by default | Axis Rz (twist) | axis |
| Roll left | Q | not bound by default | single press |
| Roll right | E | not bound by default | single press |
| Throttle - Increase | W | not bound by default | single press |
| Throttle - Decrease | S | not bound by default | single press |
| Boost | Left Shift | Button 8 | hold |
| Spacebrake | X | not bound by default | single press |
| Speed Limiter - Enable / Disable | not bound by default | not bound by default | toggle |
| Speed Limiter - Step Up (tap) | Left Alt + Mouse wheel up | not bound by default | single press |
| Speed Limiter - Step Down (tap) | Left Alt + Mouse wheel down | not bound by default | single press |
| Acceleration Limiter - Step Up (tap) | Right Alt + Mouse wheel up | not bound by default | single press |
| Acceleration Limiter - Step Down (tap) | Right Alt + Mouse wheel down | not bound by default | single press |
Game default binding, game version 4.10.0-hotfix (55227). If you rebound it yourself, your binding applies.
Anything marked “not bound by default” you have to bind yourself in the game settings – we do not guess a key.
HOTAS/HOSAS: the joystick column is the default binding of ONE stick. On two sticks you assign pitch, yaw, roll and lateral strafe yourself – which axis a manoeuvre needs is listed in the HOTAS / HOSAS section.
HOTAS / HOSAS
A manoeuvre does not need particular keys, it needs particular axes and functions. If you fly HOTAS or HOSAS you assign them once and then only read which of them a manoeuvre asks for:
- Pitch, yaw, roll – the three rotation axes. By default on one stick they sit on X, Y and the twist axis Rz.
- Strafe X/Y/Z – sideways, up/down, forward/back. By default these are single buttons and a hat, not axes; on HOSAS you put them on the second stick’s axes.
- Throttle – the throttle lever or the forward/back function.
- Boost, space brake, decoupled mode – three buttons you must hit blind in a fight.
- Targeting – at least “lock target under reticle” on a thumb button.
Which of these are bound by default is in the table above. Everything marked “not bound by default” you assign yourself.
You need pitch, roll and a finely metered throttle. The rate fight is where a real throttle lever makes the biggest difference: you can hold the turn speed instead of hunting for it in steps.
Speed and energy
The rate fight is a war of attrition. Boost shortens a single turn but widens the circle – over several laps you usually lose angle with it. The acceleration limiter decides how hard your ship enters the turn; running it wide open usually costs more speed in the turn.
Movement diagram
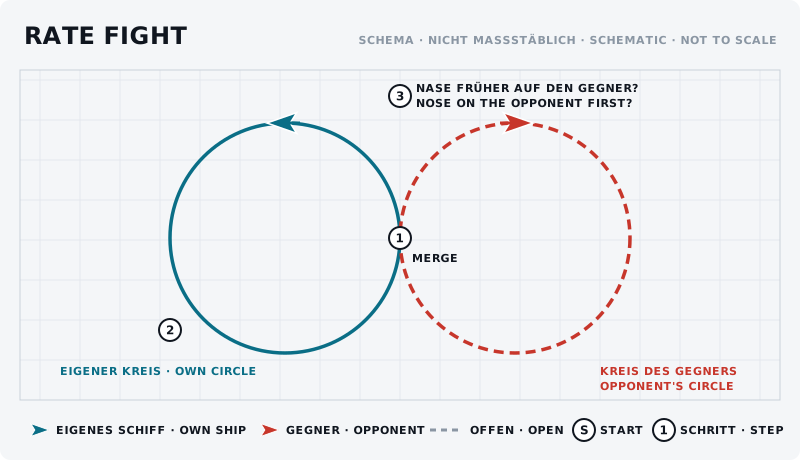
The sketch shows the manoeuvre from above: own ship blue, opponent red, start marked “S”, steps numbered.
What should the opponent see?
He sees you turning the same way and counts along. When he notices he is losing the rate fight he will switch to a radius fight or break out vertically – be ready for that.
Typical mistakes
- Full throttle. The most common cause of a lost rate fight.
- Correcting constantly. Every jerk of the nose costs angle.
- Turning in the wrong axis. Most ships pitch better than they yaw.
- Staying too long. If you have gained no angle after two laps you will not gain any in the fifth.
Opponent’s counter
He switches to a radius fight and forces you to come to him. Or he pulls out vertically so your circle runs into nothing.
Exercise
- Goal
- Find your own best sustained turn – the speed at which your ship comes around fastest.
- Preparation
- Alone, open space, one fixed reference point (station, moon, wreck).
- Task
- Fly full 360-degree turns at three different speeds: capped, medium, full. Roughly time each lap. Note which speed comes around fastest – that is your turn speed for this ship.
- Success criterion
- You know the speed at which the full turn takes the least time on your ship, and you can set it in a fight.
- Partner
- required
- Functions needed
- Pitch
- Pitch up
- Pitch down
- Yaw
- Yaw left
- Yaw right
Beginner variant
Fly full turns alone at different speeds and get to know your ship before flying this against someone.
Advanced variant
Rate fight over at least five laps against a partner in a different ship. Report after each lap who gained angle – then swap ships.
Next step
If the rate fight goes nowhere the radius fight is the answer. Why the two belong together is in energy and power management.