What is it?
A radius fight is not about coming around faster but tighter. Both fly on the same circle, opposite each other. Whoever flies the tighter arc cuts distance and meets the other sooner.
When do I use it?
When you are losing the rate fight but your ship is slower and more agile than his. Also against heavy, fast ships that need a wide circle.
What do I want to achieve?
You want to shorten the path, not the time: when you are opposite each other on the same circle, the winner is not the faster one but the one whose arc covers less distance.
Starting position
After the merge, both turning the same way, but you are not coming around faster than him.
Step by step
- Take speed off. Throttle back, brake briefly if needed. Slower means tighter.
- Roll into the strongest axis. On most ships that is pitch – so roll so that the turn goes up or down.
- Pull tight and hold. The circle as small as possible without coming to a stop.
- Meet opposite. After half a lap you should meet head-on – then you got there first.
- Shoot or continue. Either you have the firing solution now, or you have a new merge and start again.
Keyboard and mouse
The only difference from the rate fight is the throttle: same turn, less speed. A short tap on the space brake gets you into the tight circle faster than the throttle.
Turning tight means taking off speed and putting the turn in the strongest axis. The space brake is a tool here, not an emergency button.
| Game action | Default keyboard/mouse | Default joystick | Trigger |
|---|---|---|---|
| Pitch | not bound by default | Axis Y | axis |
| Pitch up | Arrow down | not bound by default | single press |
| Pitch down | Arrow up | not bound by default | single press |
| Yaw | not bound by default | Axis X | axis |
| Yaw left | Arrow left | not bound by default | single press |
| Yaw right | Arrow right | not bound by default | single press |
| Roll | not bound by default | Axis Rz (twist) | axis |
| Roll left | Q | not bound by default | single press |
| Roll right | E | not bound by default | single press |
| Throttle - Increase | W | not bound by default | single press |
| Throttle - Decrease | S | not bound by default | single press |
| Boost | Left Shift | Button 8 | hold |
| Spacebrake | X | not bound by default | single press |
| Speed Limiter - Enable / Disable | not bound by default | not bound by default | toggle |
| Speed Limiter - Step Up (tap) | Left Alt + Mouse wheel up | not bound by default | single press |
| Speed Limiter - Step Down (tap) | Left Alt + Mouse wheel down | not bound by default | single press |
Game default binding, game version 4.10.0-hotfix (55227). If you rebound it yourself, your binding applies.
Anything marked “not bound by default” you have to bind yourself in the game settings – we do not guess a key.
HOTAS/HOSAS: the joystick column is the default binding of ONE stick. On two sticks you assign pitch, yaw, roll and lateral strafe yourself – which axis a manoeuvre needs is listed in the HOTAS / HOSAS section.
HOTAS / HOSAS
A manoeuvre does not need particular keys, it needs particular axes and functions. If you fly HOTAS or HOSAS you assign them once and then only read which of them a manoeuvre asks for:
- Pitch, yaw, roll – the three rotation axes. By default on one stick they sit on X, Y and the twist axis Rz.
- Strafe X/Y/Z – sideways, up/down, forward/back. By default these are single buttons and a hat, not axes; on HOSAS you put them on the second stick’s axes.
- Throttle – the throttle lever or the forward/back function.
- Boost, space brake, decoupled mode – three buttons you must hit blind in a fight.
- Targeting – at least “lock target under reticle” on a thumb button.
Which of these are bound by default is in the table above. Everything marked “not bound by default” you assign yourself.
You need pitch, roll, throttle and the space brake. The space brake should be on a button you can reach while turning without letting go of the stick.
Speed and energy
The radius fight costs speed – that is its price. Brake too far and you are stationary and an easy target for any third party. Whoever wins the tight circle should use the firing solution: a second lap costs even more speed.
Movement diagram
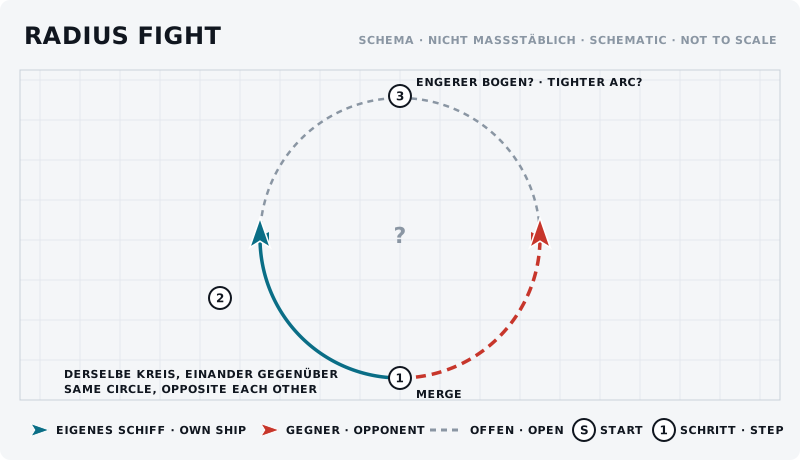
The sketch shows the manoeuvre from above: own ship blue, opponent red, start marked “S”, steps numbered.
What should the opponent see?
He sees you slowing down and closing the circle. An experienced opponent recognises this and goes tight himself – then it is decided by whose ship can turn tighter.
Typical mistakes
- Braking too far. Standing still is not a tight circle, it is a target.
- Turning in the weak axis. Yawing instead of pitching makes the circle needlessly wide.
- A radius fight against a more agile ship. Then you lose exactly where you meant to win.
- Not using the firing solution. The tight circle is dearly bought; if you do not shoot you have only lost speed.
Opponent’s counter
He stays in the rate fight and outruns you until he is behind you again – your slow tight circle is useless if he does not fly it. Or he uses your low speed for an approach from outside.
Exercise
- Goal
- Find the smallest possible turn circle of your own ship and be able to hold it.
- Preparation
- Alone, open space, two reference points in sight.
- Task
- Fly full turns and take speed off step by step until the circle stops getting smaller. Remember that speed. Then alternate one lap at that speed and one at full speed.
- Success criterion
- On call you can go into your ship’s tightest circle without coming to a stop.
- Partner
- required
- Functions needed
- Pitch
- Pitch up
- Pitch down
- Yaw
- Yaw left
- Yaw right
Beginner variant
Fly alone: a full turn at full speed, then a full turn at half. Look at how differently sized the circles are.
Advanced variant
Radius fight against a partner who stays in the rate fight. Who wins depends on the ships – then swap and fly the same situation the other way round.
Next step
The tight turn is a craft of its own: tight turn – high-G and boost. And when he gets too close while you do it: overshoot.