What is it?
The orbit is a circular path around the opponent. You fly past him sideways, constantly pull your nose towards him and strafe outwards or inwards at the same time so the circle does not open up.
When do I use it?
Neutral to slightly offensive. When neither is behind the other and both are close – or when you want to circle a slower but tougher opponent instead of attacking head-on.
What do I want to achieve?
You want time on target without return fire: if the circle is right your nose points at him, his never points at you for long. At the same time you keep the distance constant instead of having to re-approach again and again.
Starting position
Close range, opponent locked, both at a similar level. The opponent is flying slowly or turning on the spot.
Step by step
- Pass to the side. Do not fly at the opponent, fly past him.
- Bring the nose across. As soon as he is to your side, pull the nose onto him and hold it there.
- Strafe outwards. Without lateral thrust you drift inwards until you are too close. Strafing keeps the circle round.
- Adjust throttle. Too much throttle widens the circle, too little drops you into the centre.
- Change direction. After a few laps reverse the direction so the opponent cannot settle on one side.
Keyboard and mouse
The orbit is the manoeuvre that asks the most of keyboard and mouse at once: the mouse pulls the nose, two strafe keys hold the circle, the throttle sets its size. Practise holding the nose first, then add strafing.
Circling means constantly pulling in one direction while strafing sideways. Plus targeting, so the nose knows where to go.
| Game action | Default keyboard/mouse | Default joystick | Trigger |
|---|---|---|---|
| Pitch | not bound by default | Axis Y | axis |
| Pitch up | Arrow down | not bound by default | single press |
| Pitch down | Arrow up | not bound by default | single press |
| Yaw | not bound by default | Axis X | axis |
| Yaw left | Arrow left | not bound by default | single press |
| Yaw right | Arrow right | not bound by default | single press |
| Roll | not bound by default | Axis Rz (twist) | axis |
| Roll left | Q | not bound by default | single press |
| Roll right | E | not bound by default | single press |
| Strafe up (abs.) | Space | Button 9 | single press |
| Strafe down (abs.) | Left Ctrl | Button 10 | single press |
| Strafe left (abs.) | A | Hat 1 left | single press |
| Strafe right (abs.) | D | Hat 1 right | single press |
| Throttle - Increase | W | not bound by default | single press |
| Throttle - Decrease | S | not bound by default | single press |
| Lock Target Under Reticle | not bound by default | not bound by default | single press |
| Cycle Lock - Hostiles - Forward | 5 | not bound by default | single press |
| Lock Selected Target | not bound by default | not bound by default | single press |
Game default binding, game version 4.10.0-hotfix (55227). If you rebound it yourself, your binding applies.
Anything marked “not bound by default” you have to bind yourself in the game settings – we do not guess a key.
HOTAS/HOSAS: the joystick column is the default binding of ONE stick. On two sticks you assign pitch, yaw, roll and lateral strafe yourself – which axis a manoeuvre needs is listed in the HOTAS / HOSAS section.
HOTAS / HOSAS
A manoeuvre does not need particular keys, it needs particular axes and functions. If you fly HOTAS or HOSAS you assign them once and then only read which of them a manoeuvre asks for:
- Pitch, yaw, roll – the three rotation axes. By default on one stick they sit on X, Y and the twist axis Rz.
- Strafe X/Y/Z – sideways, up/down, forward/back. By default these are single buttons and a hat, not axes; on HOSAS you put them on the second stick’s axes.
- Throttle – the throttle lever or the forward/back function.
- Boost, space brake, decoupled mode – three buttons you must hit blind in a fight.
- Targeting – at least “lock target under reticle” on a thumb button.
Which of these are bound by default is in the table above. Everything marked “not bound by default” you assign yourself.
The orbit lives on lateral strafe and vertical strafe. On HOSAS they belong on the left stick’s axes – then the circle is a steady movement instead of a series of key presses. This is exactly where a stick is clearly ahead of the keyboard.
Speed and energy
The orbit uses little energy as long as you do not boost. It is the manoeuvre for a long fight: constant speed, constant distance. You only need boost to leave the circle.
Movement diagram
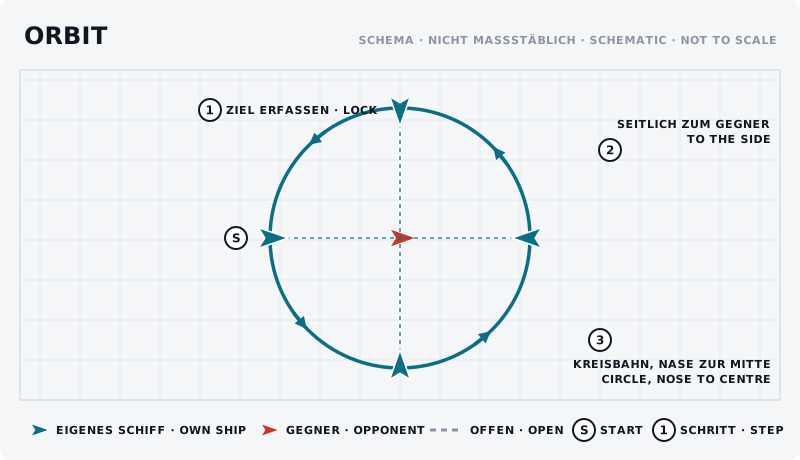
The sketch shows the manoeuvre from above: own ship blue, opponent red, start marked “S”, steps numbered.
What should the opponent see?
He sees a ship constantly sliding past to his side. As long as your circle is even he can work out his lead – so change the direction.
Typical mistakes
- Falling inwards. Without strafing the circle gets tighter until you are stuck on the opponent and he only has to dust you off.
- Too much throttle. The circle gets so wide that you have no firing solution in between.
- Always the same direction. After the third lap he knows where you will appear.
- Nose only, no strafing. Then you are not flying a circle but a spiral into the centre.
Opponent’s counter
He turns with you and makes your orbit a shared circle – then you are in a rate fight. Or he breaks out, forces you to chase and waits for you to overshoot.
Exercise
- Goal
- Fly one full circle around a stationary partner without letting the nose drift off.
- Preparation
- One partner holds station and only rotates. Open space, no obstacles.
- Task
- Fly five full circles, alternating left and right. The opponent should stay in the reticle without re-aiming. Then swap roles.
- Success criterion
- You complete a full circle without losing the lock and without leaving the circle.
- Partner
- required
- Functions needed
- Pitch
- Pitch up
- Pitch down
- Yaw
- Yaw left
- Yaw right
Beginner variant
Practise the orbit on a partner holding still. First only hold the nose, then add strafing, finally meter the throttle.
Advanced variant
Orbit against a partner who also turns. Change direction on call and watch who gets the nose back on first after the change.
Next step
The orbit only becomes round with proper strafing. After that pursuit curves show where the nose belongs.