What is it?
The merge is the moment when two ships on reciprocal courses pass close by each other. It is not a manoeuvre you “do” – it happens as soon as two ships fly towards each other. What you decide beforehand determines who gets the nose on the other first afterwards.
When do I use it?
Neutral. The merge stands at the beginning of almost every duel: both see each other, both fly towards each other, neither is behind the other.
What do I want to achieve?
You want to come out of a neutral situation with speed, heading and distance that suit your next manoeuvre – without losing sight of the opponent. A merge after which you first have to look for the opponent is already half lost.
Starting position
Both ships far apart, noses towards each other, the opponent locked. Combat mode, shields and weapons on.
Step by step
- Lock. Put the opponent under your reticle and lock him while he is still far away.
- Set your speed. Cap your speed instead of approaching at full throttle. Too fast means you fly far out after the pass and need a long time back.
- Hold the approach. Fly slightly offset, not exactly nose to nose – that gives you lateral separation at the pass and the opponent a harder firing line.
- The pass. Close by. Do not shoot and do not stare in this moment; prepare for the turn instead.
- Turn immediately. Do not fly on straight. The turn begins while the opponent is still beside you.
- Look back. Pull your head or camera along, keep the opponent in sight; the lock helps you find him again.
Keyboard and mouse
On keyboard and mouse you fly the merge with the mouse (pitch and yaw), roll on the two roll keys and the throttle. The speed limiter is bound by default to the mouse wheel together with a modifier – it is the one setting you can still change during the approach without taking your hand off the mouse.
The merge itself is pitch, yaw, roll and throttle. Add targeting so you do not lose the opponent after the pass, and the speed limiter to cap your approach speed.
| Game action | Default keyboard/mouse | Default joystick | Trigger |
|---|---|---|---|
| Pitch | not bound by default | Axis Y | axis |
| Pitch up | Arrow down | not bound by default | single press |
| Pitch down | Arrow up | not bound by default | single press |
| Yaw | not bound by default | Axis X | axis |
| Yaw left | Arrow left | not bound by default | single press |
| Yaw right | Arrow right | not bound by default | single press |
| Roll | not bound by default | Axis Rz (twist) | axis |
| Roll left | Q | not bound by default | single press |
| Roll right | E | not bound by default | single press |
| Throttle - Increase | W | not bound by default | single press |
| Throttle - Decrease | S | not bound by default | single press |
| Boost | Left Shift | Button 8 | hold |
| Spacebrake | X | not bound by default | single press |
| Lock Target Under Reticle | not bound by default | not bound by default | single press |
| Cycle Lock - Hostiles - Forward | 5 | not bound by default | single press |
| Lock Selected Target | not bound by default | not bound by default | single press |
| Speed Limiter - Enable / Disable | not bound by default | not bound by default | toggle |
| Speed Limiter - Step Up (tap) | Left Alt + Mouse wheel up | not bound by default | single press |
| Speed Limiter - Step Down (tap) | Left Alt + Mouse wheel down | not bound by default | single press |
Game default binding, game version 4.10.0-hotfix (55227). If you rebound it yourself, your binding applies.
Anything marked “not bound by default” you have to bind yourself in the game settings – we do not guess a key.
HOTAS/HOSAS: the joystick column is the default binding of ONE stick. On two sticks you assign pitch, yaw, roll and lateral strafe yourself – which axis a manoeuvre needs is listed in the HOTAS / HOSAS section.
HOTAS / HOSAS
A manoeuvre does not need particular keys, it needs particular axes and functions. If you fly HOTAS or HOSAS you assign them once and then only read which of them a manoeuvre asks for:
- Pitch, yaw, roll – the three rotation axes. By default on one stick they sit on X, Y and the twist axis Rz.
- Strafe X/Y/Z – sideways, up/down, forward/back. By default these are single buttons and a hat, not axes; on HOSAS you put them on the second stick’s axes.
- Throttle – the throttle lever or the forward/back function.
- Boost, space brake, decoupled mode – three buttons you must hit blind in a fight.
- Targeting – at least “lock target under reticle” on a thumb button.
Which of these are bound by default is in the table above. Everything marked “not bound by default” you assign yourself.
For the merge you need pitch, yaw, roll, throttle and a thumb button for targeting. If you put the speed limiter on an axis or a rotary you can set the approach speed steplessly without looking.
Speed and energy
The merge is where too much speed is punished. If you approach at full throttle and boost you have a wide turn circle after the pass and fly away from the opponent – the turn then takes longer than his entire manoeuvre. Take speed off before the pass, not after. Save boost for the turn or the exit.
Movement diagram
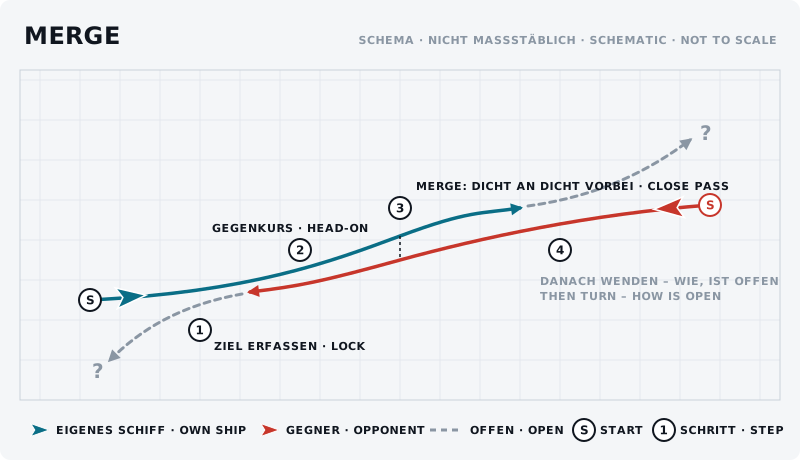
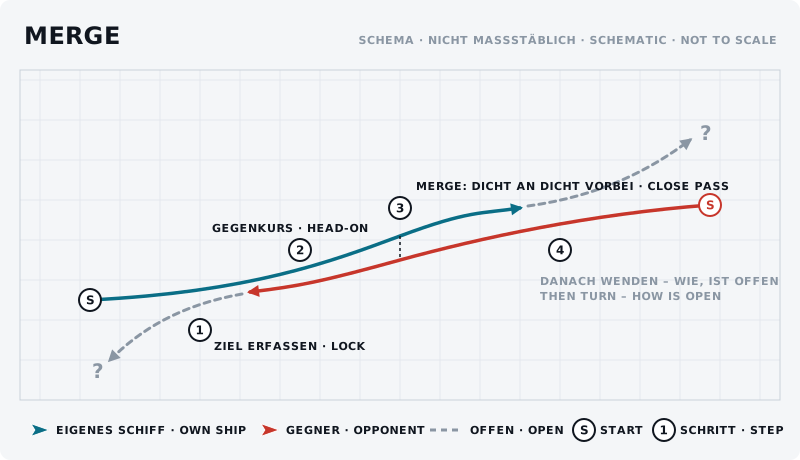
The sketch shows the manoeuvre from above: own ship blue, opponent red, start marked “S”, steps numbered.
What should the opponent see?
He sees your nose and your flight direction. As long as both are the same he can predict you easily. A slightly offset approach and a short strafe just before the pass make your path harder to predict – and do not yet give away which way you will turn.
Typical mistakes
- Entering the merge at full throttle. The most common mistake. You fly far out and hand the opponent the first turn.
- Shooting during the pass. Low hit chance, big distraction.
- Flying straight after the pass. Every second straight is a second the opponent gets for free for his turn.
- Losing the lock. Without a lock you search empty space after the pass.
- Exactly nose to nose. Looks determined, but makes you predictable and in the worst case both ships meet.
Opponent’s counter
He can turn earlier than you (see Lead Turn), he can take off speed himself, or he keeps more distance at the pass to see your first turn before choosing his own.
Exercise
- Goal
- Fly the pass cleanly and close and have the opponent back in sight immediately afterwards.
- Preparation
- Two pilots with identical ships, agreed beforehand, in open space without obstacles. One flies the merge, one the opponent.
- Task
- Ten runs. Each time: lock, hold the reciprocal course, pass close, straight into the turn. Swap roles after each run. Note who got the nose on the other first after the pass.
- Success criterion
- You no longer lose the lock after the pass and start the turn without first flying straight on.
- Partner
- required
- Functions needed
- Lock Target Under Reticle
- Speed Limiter - Enable / Disable
Beginner variant
Fly the merge with plenty of lateral separation and heavily reduced speed. The only goal: do not lose sight of the opponent at the pass and enter the turn cleanly.
Advanced variant
Go straight from the pass into the turn and alternate: once like in a rate fight, once like in a radius fight. Watch who loses how much speed.
Next step
The next step is the lead turn: turning earlier instead of waiting for the pass. After that the rate fight or radius fight decides how the turn continues.