What is it?
The J-hook is a straight run away from the opponent followed by a tight arc back. From above the path looks like a J.
When do I use it?
Defensive turning offensive. When you need separation – after a lost turning fight, after a shield hit – and want to attack again straight away.
What do I want to achieve?
You want to buy separation and spend it immediately: the straight part takes you out of his weapons range, the hook brings you back with speed and nose first.
Starting position
The opponent is close, you have no good firing solution but still have shields. There is open space ahead of you.
Step by step
- Away. Nose away from the opponent, full throttle, boost if needed. Straight, short, decisive.
- Judge the distance. Far enough that his fire no longer connects – no further, or the way back takes too long.
- Pull the hook. Pitch hard and roll with it so the arc stays tight.
- Nose first. At the end of the hook your nose points at him before your ship is back there.
- Approach. Now you are back in the starting position of a merge – with the advantage that you see him coming.
Keyboard and mouse
The straight part is holding throttle, the hook is pulling the mouse plus the roll key. Pulling the hook with the mouse alone makes it flat; rolling makes it tight.
First build speed, then turn hard: throttle and boost for the straight part, pitch and roll for the hook, the space brake as an emergency stop.
| Game action | Default keyboard/mouse | Default joystick | Trigger |
|---|---|---|---|
| Pitch | not bound by default | Axis Y | axis |
| Pitch up | Arrow down | not bound by default | single press |
| Pitch down | Arrow up | not bound by default | single press |
| Yaw | not bound by default | Axis X | axis |
| Yaw left | Arrow left | not bound by default | single press |
| Yaw right | Arrow right | not bound by default | single press |
| Roll | not bound by default | Axis Rz (twist) | axis |
| Roll left | Q | not bound by default | single press |
| Roll right | E | not bound by default | single press |
| Throttle - Increase | W | not bound by default | single press |
| Throttle - Decrease | S | not bound by default | single press |
| Boost | Left Shift | Button 8 | hold |
| Spacebrake | X | not bound by default | single press |
| Cycle Lock - Attackers - Forward | 4 | not bound by default | single press |
| Enable / Disable decoupled mode | C | not bound by default | toggle |
Game default binding, game version 4.10.0-hotfix (55227). If you rebound it yourself, your binding applies.
Anything marked “not bound by default” you have to bind yourself in the game settings – we do not guess a key.
HOTAS/HOSAS: the joystick column is the default binding of ONE stick. On two sticks you assign pitch, yaw, roll and lateral strafe yourself – which axis a manoeuvre needs is listed in the HOTAS / HOSAS section.
HOTAS / HOSAS
A manoeuvre does not need particular keys, it needs particular axes and functions. If you fly HOTAS or HOSAS you assign them once and then only read which of them a manoeuvre asks for:
- Pitch, yaw, roll – the three rotation axes. By default on one stick they sit on X, Y and the twist axis Rz.
- Strafe X/Y/Z – sideways, up/down, forward/back. By default these are single buttons and a hat, not axes; on HOSAS you put them on the second stick’s axes.
- Throttle – the throttle lever or the forward/back function.
- Boost, space brake, decoupled mode – three buttons you must hit blind in a fight.
- Targeting – at least “lock target under reticle” on a thumb button.
Which of these are bound by default is in the table above. Everything marked “not bound by default” you assign yourself.
You need throttle, boost, pitch and roll. On HOTAS the J-hook is the simplest of the manoeuvres: one throttle run, one turn. Decoupled mode helps to tighten the hook but needs a button near the thumb.
Speed and energy
The J-hook is a trade: you spend time and boost and get separation. It pays off when your shields need to recharge. It does not pay off when the opponent is faster than you – then he catches you on the straight part.
Movement diagram
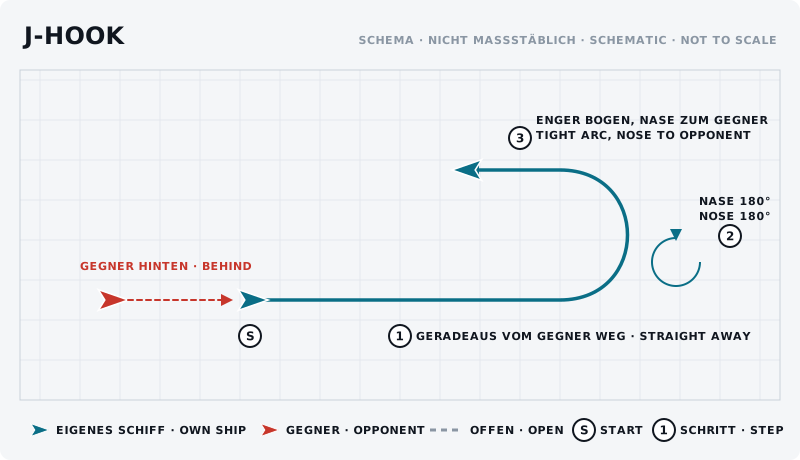
The sketch shows the manoeuvre from above: own ship blue, opponent red, start marked “S”, steps numbered.
What should the opponent see?
He sees you fleeing. That is exactly the point: many then chase in a straight line and end up head-on at the end of your hook.
Typical mistakes
- Too far away. The way back takes so long that he calmly restores shields and position.
- A flat hook. Without roll the arc goes wide and you come out from the side instead of head-on.
- Fleeing without the hook. Just flying away shows him your tail – the easiest firing solution there is.
- Against a faster ship. Then the straight part is a gift.
Opponent’s counter
He does not follow in a straight line but cuts the hook and is already there at the exit. Or he holds station, only rotates and waits for your return with guns set.
Exercise
- Goal
- Fly the hook tight enough to bring your nose back onto the starting point.
- Preparation
- A partner stays at the starting point and only rotates.
- Task
- Fly away from the partner, pull the hook after five seconds and come back nose-on. Ten runs, five with boost on the straight part and five without. Compare how long each takes.
- Success criterion
- You come out with your nose on the partner without having to correct afterwards.
- Partner
- required
- Functions needed
- Pitch
- Pitch up
- Pitch down
- Yaw
- Yaw left
- Yaw right
Beginner variant
Fly the J-hook without an opponent. Goal: after the hook, point back at the same spot you started from.
Advanced variant
J-hook against a partner who chases. Alternate whether you pull the hook up, down or sideways – and watch which direction he follows worst.
Next step
If the straight part is too dangerous you need the reversal: the same idea without the run away.