What is it?
The defensive spiral is a path that constantly changes direction and lateral movement without coming to a stop. It combines turning, strafing and throttle changes into something that cannot be led cleanly.
When do I use it?
Defensive, when you are outnumbered, waiting for help, or your shields need time. It wins nothing – it buys time.
What do I want to achieve?
You want to buy time without giving up control. A straight run away is easier to hit than any spiral.
Starting position
One or more opponents behind you, your shields dropping, no escape route within reach.
Step by step
- Hold a turn. A constant, not too tight turn is the basis – it costs little speed.
- Add strafing. Irregularly, in changing directions.
- Change plane. Do not circle in one plane, wander up and down.
- Vary the throttle. Take it off briefly in between and open it up again.
- Observe. Cycle through attackers. Who is chasing, who has broken off, who has just joined.
- Look for the exit. The spiral is not a goal. As soon as someone overshoots or help arrives: out and attack.
Keyboard and mouse
This is the most demanding combination in the whole dogfight path: the mouse pulls, two to four strafe keys alternate, the throttle changes. Learn it in that order, not all at once.
Everything that changes your path without stopping you: rotation axes, strafe directions, throttle – and attacker cycling to see who is still there.
| Game action | Default keyboard/mouse | Default joystick | Trigger |
|---|---|---|---|
| Pitch | not bound by default | Axis Y | axis |
| Pitch up | Arrow down | not bound by default | single press |
| Pitch down | Arrow up | not bound by default | single press |
| Yaw | not bound by default | Axis X | axis |
| Yaw left | Arrow left | not bound by default | single press |
| Yaw right | Arrow right | not bound by default | single press |
| Roll | not bound by default | Axis Rz (twist) | axis |
| Roll left | Q | not bound by default | single press |
| Roll right | E | not bound by default | single press |
| Strafe up (abs.) | Space | Button 9 | single press |
| Strafe down (abs.) | Left Ctrl | Button 10 | single press |
| Strafe left (abs.) | A | Hat 1 left | single press |
| Strafe right (abs.) | D | Hat 1 right | single press |
| Throttle - Increase | W | not bound by default | single press |
| Throttle - Decrease | S | not bound by default | single press |
| Boost | Left Shift | Button 8 | hold |
| Spacebrake | X | not bound by default | single press |
| Cycle Lock - Attackers - Forward | 4 | not bound by default | single press |
Game default binding, game version 4.10.0-hotfix (55227). If you rebound it yourself, your binding applies.
Anything marked “not bound by default” you have to bind yourself in the game settings – we do not guess a key.
HOTAS/HOSAS: the joystick column is the default binding of ONE stick. On two sticks you assign pitch, yaw, roll and lateral strafe yourself – which axis a manoeuvre needs is listed in the HOTAS / HOSAS section.
HOTAS / HOSAS
A manoeuvre does not need particular keys, it needs particular axes and functions. If you fly HOTAS or HOSAS you assign them once and then only read which of them a manoeuvre asks for:
- Pitch, yaw, roll – the three rotation axes. By default on one stick they sit on X, Y and the twist axis Rz.
- Strafe X/Y/Z – sideways, up/down, forward/back. By default these are single buttons and a hat, not axes; on HOSAS you put them on the second stick’s axes.
- Throttle – the throttle lever or the forward/back function.
- Boost, space brake, decoupled mode – three buttons you must hit blind in a fight.
- Targeting – at least “lock target under reticle” on a thumb button.
Which of these are bound by default is in the table above. Everything marked “not bound by default” you assign yourself.
You need all three rotation axes, strafe X and Y and a throttle you can move on the side. This is where HOSAS has the clearest advantage: the left hand flies the path, the right keeps the nose.
Speed and energy
The spiral should keep speed, not spend it. Turning too tight makes you slow and easier to hit. Use boost only for the exit, not to keep going – otherwise you will not have it when you need it.
Movement diagram
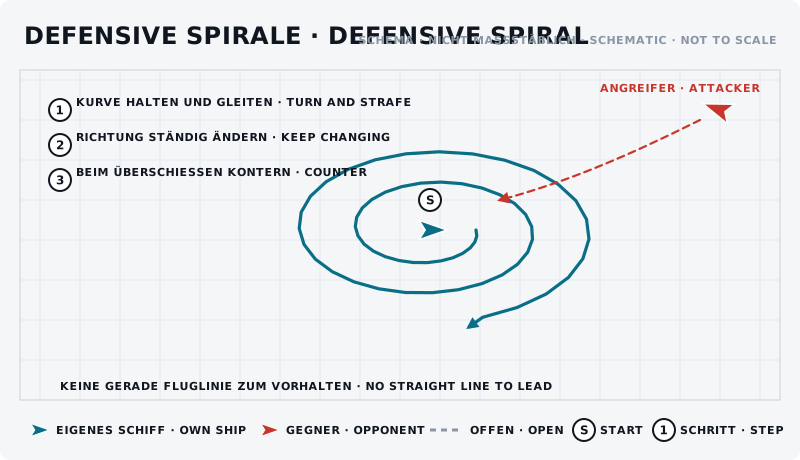
The sketch shows the manoeuvre from above: own ship blue, opponent red, start marked “S”, steps numbered.
What should the opponent see?
He sees a target that never settles. Attacking alone costs him time and ammunition. Two attackers split up: one drives, one waits – which is why you must know where both are.
Typical mistakes
- Spiralling evenly. After two laps it is a path like any other.
- Too tight. Costs speed, and eventually you stop.
- Never looking. If you do not know where the attackers are you fly into the second one.
- Spiralling forever. It buys time. If the time buys nothing it is wasted.
Opponent’s counter
One stays on you and drives you, the second places himself in your path and waits. That is exactly why the spiral only buys time and wins no fights.
Exercise
- Goal
- Survive for a minute without shooting back – and afterwards be able to say who was where.
- Preparation
- One or two partners attack and shoot (agreed beforehand, shields up, no missiles).
- Task
- Fly a defensive spiral for 60 seconds. You may not shoot. Afterwards: how much shield is left? From which direction did the hits come? Where were the attackers at the end? Repeat until you can answer the last question.
- Success criterion
- You come out of the minute with shields left and can say where the attackers were.
- Partner
- required
- Functions needed
- Pitch
- Pitch up
- Pitch down
- Yaw
- Yaw left
- Yaw right
Beginner variant
Fly the spiral without attackers and only watch that you never hold the same path for two seconds.
Advanced variant
Spiral against two attackers, with an exit: as soon as one overshoots, swing in behind him and attack.
Next step
If you are outnumbered you should not be flying alone: wingman and multi-target combat describe the answer to this situation.