What is it?
The corkscrew is a helical path around your own flight line. Roughly speaking you keep flying straight, but your ship constantly describes a circle around that line.
When do I use it?
Defensive or when disengaging. When someone is behind you and you still have to hold a direction – towards a target, towards your people, out of the zone.
What do I want to achieve?
You want to make leading impossible without giving up your heading. Every turn costs time; the corkscrew costs almost none because on average you still go where you want to go.
Starting position
The opponent is behind you, within weapons range, but without a settled lead. Your heading is fixed.
Step by step
- Fix the direction. Where do you want to go? That line stays the centre of the helix.
- Roll and pull. Roll slightly and continuously while pulling steadily – the helix follows by itself.
- Keep the turns uneven. Sometimes tighter, sometimes wider. An even helix is as predictable as a straight line.
- Look behind. Lock the attacker and keep him in view; that way you notice whether he is still following.
- Plan the exit. Either you reach your goal or you break into a counter-manoeuvre.
Keyboard and mouse
On keyboard and mouse there are two ways: roll continuously and pull with the mouse, or alternate the four strafe directions rhythmically. The second keeps the nose steadier – useful if you want to shoot forward.
The helix comes from rolling plus constant pulling – or from two strafe directions in alternation. Both are listed here.
| Game action | Default keyboard/mouse | Default joystick | Trigger |
|---|---|---|---|
| Pitch | not bound by default | Axis Y | axis |
| Pitch up | Arrow down | not bound by default | single press |
| Pitch down | Arrow up | not bound by default | single press |
| Yaw | not bound by default | Axis X | axis |
| Yaw left | Arrow left | not bound by default | single press |
| Yaw right | Arrow right | not bound by default | single press |
| Roll | not bound by default | Axis Rz (twist) | axis |
| Roll left | Q | not bound by default | single press |
| Roll right | E | not bound by default | single press |
| Strafe up (abs.) | Space | Button 9 | single press |
| Strafe down (abs.) | Left Ctrl | Button 10 | single press |
| Strafe left (abs.) | A | Hat 1 left | single press |
| Strafe right (abs.) | D | Hat 1 right | single press |
| Throttle - Increase | W | not bound by default | single press |
| Throttle - Decrease | S | not bound by default | single press |
| Cycle Lock - Attackers - Forward | 4 | not bound by default | single press |
Game default binding, game version 4.10.0-hotfix (55227). If you rebound it yourself, your binding applies.
Anything marked “not bound by default” you have to bind yourself in the game settings – we do not guess a key.
HOTAS/HOSAS: the joystick column is the default binding of ONE stick. On two sticks you assign pitch, yaw, roll and lateral strafe yourself – which axis a manoeuvre needs is listed in the HOTAS / HOSAS section.
HOTAS / HOSAS
A manoeuvre does not need particular keys, it needs particular axes and functions. If you fly HOTAS or HOSAS you assign them once and then only read which of them a manoeuvre asks for:
- Pitch, yaw, roll – the three rotation axes. By default on one stick they sit on X, Y and the twist axis Rz.
- Strafe X/Y/Z – sideways, up/down, forward/back. By default these are single buttons and a hat, not axes; on HOSAS you put them on the second stick’s axes.
- Throttle – the throttle lever or the forward/back function.
- Boost, space brake, decoupled mode – three buttons you must hit blind in a fight.
- Targeting – at least “lock target under reticle” on a thumb button.
Which of these are bound by default is in the table above. Everything marked “not bound by default” you assign yourself.
You need roll and one rotation axis – or strafe X and Y together. On HOSAS the two-strafe-axis variant is the more comfortable one: the right stick stays free for the nose.
Speed and energy
The corkscrew costs almost no speed as long as the turns stay wide. If the helix gets tight you lose speed as in a sustained turn. Boost widens the path and makes it predictable again – use it sparingly.
Movement diagram
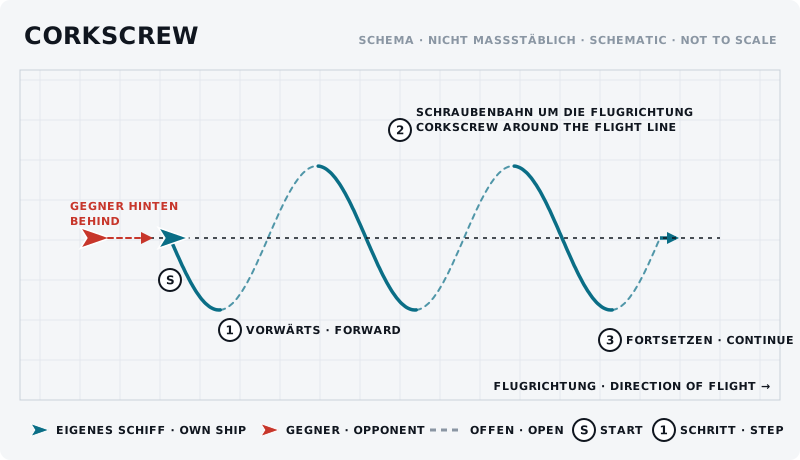
The sketch shows the manoeuvre from above: own ship blue, opponent red, start marked “S”, steps numbered.
What should the opponent see?
He sees a ship winding in front of him. His lead point keeps jumping because your lateral movement keeps changing direction.
Typical mistakes
- An even helix. Within seconds it becomes a rhythm he can settle into.
- Turns too tight. They cost speed, and he cuts the corner.
- Never looking back. You do not notice that he has long since broken off – or that a second one has joined.
- Corkscrew as a permanent answer. It keeps you alive but wins nothing. At some point you must turn or leave.
Opponent’s counter
He keeps distance, follows the centre line instead of your helix and waits for you to make one turn too wide or too tight. Or he shoots into the centre of the helix instead of following you.
Exercise
- Goal
- Cover a stretch of ground straight ahead without ever flying a straight line.
- Preparation
- A partner follows at constant distance and tries to keep his nose on you – without shooting.
- Task
- Fly a corkscrew for 60 seconds while the partner follows. After each run he reports how often he would have had a clean firing solution. Then swap roles.
- Success criterion
- The partner reports clearly fewer clean firing solutions than during straight flight.
- Partner
- required
- Functions needed
- Pitch
- Pitch up
- Pitch down
- Yaw
- Yaw left
- Yaw right
Beginner variant
Fly the corkscrew without a pursuer, just to get the feel for rolling and pulling at the same time.
Advanced variant
Corkscrew with changing turn size and an exit: after 30 seconds break out of the helix straight into a reversal.
Next step
If you can hold the corkscrew but still want to shake what is behind you: J-hook and reversal.